AI-Powered Perfection: The Magic Behind AI-Generated Headshots

Show clients and colleagues your best self with an AI-generated headshot. Using AI for headshots is easy, fast and low-cost. And the result will be picture perfect! Here’s a 6-step process for creating your AI-generated headshots.
Like many freelancers, I sometimes procrastinate about doing things I know I should do. I’ve been wanting to update my headshot for a long time. It’s about 10 years old and I’m not smiling, which is important in building trust.
But I hate having my photo taken so I put it off—even though I know how much first impressions matter—and that I needed to look my best in my photo on LinkedIn and my website.
Because clients and colleagues often decide we’re trustworthy and competent in the time it take to blink. At most, we have seven seconds to make an awesome first impression.
Why I Finally Got a New Headshot
Then I saw a picture-perfect AI-generated headshot another freelancer, Núria Negrão, shared on LinkedIn. It was fantastic!
I used Aragon AI, the service that Núria used. The result was the best photo of myself I’ve ever seen.

Benefits of AI-Generated Headshots
AI-generated headshots are picture perfect, easy, fast, and low-cost.
1. Picture-perfect
If you use AI for your headshots, then you’ll get picture-perfect results. Aragon AI’s website says you can “Create stunning realistic AI photos of yourself that look like they were taken by a professional photographer.” This is true.
My new headshot looks like me but the computer-generated images added a smile and made me look great.
2. Easy
You don’t have to find and book a photographer, agonize over what to wear, or spend time posing for the photographer. You just upload your photos and answer a few questions.
3. Fast
Instead of waiting days or weeks for the photographer to send you your headshots, you get AI -generated headshots in hours.
4. Low-Cost
And you don’t have to spend a lot of money on AI-generated headshots. Mine cost just $39 (see more about this below). And I got 40 different headshots in 20+ different styles, a lot more than a photographer would provide.
My previous headshot, done by a professional photographer in 2014, cost $100. That was probably less than usual, because the photographer took the headshots at a workshop, where she was able to do a lot of business in a few hours.
How to Create Your AI-Generated Headshot with Aragon AI
AI-generated headshots are computer-generated images created using AI algorithms. They’re designed to look like real headshots but are created by computer software.
Here’s a 6-step process for creating AI-generated headshots using Aragon AI. The process may be slightly different if you use another service.

1. Gather your high-quality images
You’ll need to upload images for the AI algorithm to work from. And they need to be decent quality. If the quality isn’t good enough, the service you use will tell you.
Aragon AI seems to focus on selfies. I uploaded two sets of professional headshots and a few more recent selfies. If you have a professional headshot, I recommend including that.
2. Upload your photos
Upload your photos. Aragon AI requires at least 6 photos and says that more is better. The FAQs say: “For optimal results, select a diverse range of images featuring the person in different outfits, various locations, and under various lighting conditions. Our software will automatically choose the best photos for you.”
3. Answer a few questions
Customize your photo by answering a few questions. Aragon AI asks about your age, gender, hair and eye color, and a few other things. This helps you customize your headshots.
4. Wait a little while for the results
Now the AI service will build a custom model with your digital image.
I had my new headshots in about an hour. Aragon AI created a variety of different professional headshots, with different backgrounds, poses, and styles.
And the service added a smile to most of the headshots! I wasn’t smiling in most of the photos I uploaded. I’m grateful that Aragon AI added the smile, because a smile builds trust.
I got 40 different photos. Most were headshots and a few showed me to about my waist. The photos showed me in a bunch of different hairstyles and colors, different clothes and jewelry, and different poses. Aragon AI put me in professional clothes, and somehow made most of them in my favorite colors: blue and green.
5. Choose your new headshot and (optional) edit it
Download all of the headshots you are considering. Review them carefully and choose one that projects the professional image you want clients and colleagues to see.
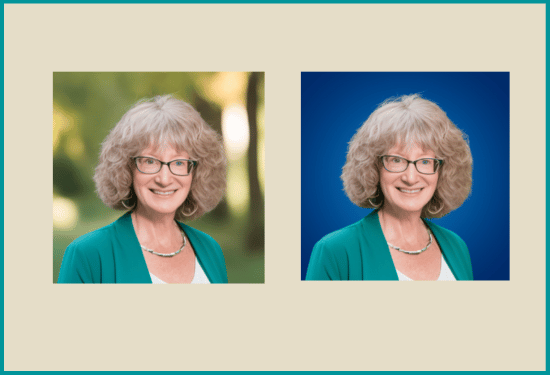
Next, I used Canva to do some editing. I could have used the same headshot I downloaded from Aragon AI. But I wanted to crop it to a head and shoulders shot and I wanted to change the background to a studio-like background.
On the left is the headshot I chose. On the right, is the edited version.

6. Share your new headshot
Add your new headshot to your LinkedIn profile, your website, and any freelance directories you’re part of. If you use other social media for business, add it there too. Also, use your new photo for presentations, bylined articles, and anywhere else you’re promoting yourself.
Here’s what my headshot looks like on my website:

Here’s what my headshot looks like on LinkedIn:


Learn More About AI-Generated Photos and AI
Content from The Mighty Marketer
How to Compete and Thrive in the Era of AI in Writing
Other Content